Scan Documents
- Connect scanner to laptop.
- Place document face-down on scanning bed. Note: Be careful not to scratch the scanning bed.
- Close scanning bed lid.
- Connect your external hard drive or USB to the computer.
- Open the Epson Scan icon located on the desktop. Note: If the icon is not there, search for “Epson Scan” and double click the icon that pops up.
Documents Settings
You can use Auto Mode or Professional Mode. Professional Mode gives you total control of your scanning settings and lets you preview your images. If you use Professional Mode, recommended settings include:
- Set the Document Type to Reflective
- Set the Auto Exposure Type to Document
- Image type: 24-bit color
- Resolution: at least 300 for documents
Preview Documents
Click the Preview button at the bottom of the settings window to view a preview of how your item will scan.
Scan and Save Documents
- When you click scan, the file save settings will pop up.
- Select your USB or external hard drive as the save location.
- Create a file naming convention (something simple like event and year) and start with 001.
- Choose PDF under IMAGE FORMAT.
- Click OK.
Scan Photographs
- Connect scanner to laptop.
- Place photographs face-down on scanning bed. Note: Be careful not to scratch the scanning bed.
- Close scanning bed lid.
- Connect your external hard drive or USB to the computer.
- Open the Epson Scan icon located on the desktop. Note: If the icon is not there, search for “Epson Scan” and double click the icon that pops up.
Photographs Settings
You can use Auto Mode or Professional Mode. Professional Mode gives you total control of your scanning settings and lets you preview your images. If you use Professional Mode, recommended settings include:
- Set the Document Type to Reflective
- Set the Auto Exposure Type to Photo
- Image type: 24-bit color
- Resolution: at least 600 for photos
Preview Photographs
Select the Thumbnail checkbox, then click the Preview button at the bottom of the settings window. The scanner should automatically recognize your photographs as separate files. You can use the Frame icons on the left side of the window to rotate or flip each image that you select.
Scan and Save Photographs
- When you click scan, the file save settings will pop up.
- Select your USB or external hard drive as the save location.
- Create a file naming convention (something simple like event and year) and start with 001.
- Choose either JPEG or TIFF under IMAGE FORMAT. (If you want to resize your image file, TIFF is better)
- Click OK.
Scan Slides or Negatives
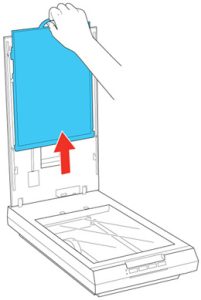
Connect scanner to laptop. To scan film strips or slides, remove the document mat from the scanner cover. This uncovers the transparency unit window. Open the scanner cover and gently slide up the document mat to remove it. Use a soft cloth to wipe the transparency unit window and the document table before placing film or slides.
Placing 35mm Film Strips
- Open the cover of the 35 mm film strip holder.
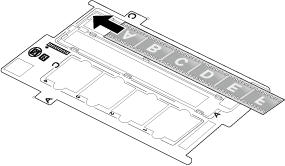
- Slide one or two film strips all the way into the film holder with the shiny base side facing down.
- Your images and any wording on the film strips should appear backwards on the side that faces up.
- Note: Hold the edge of the film gently or use gloves to touch the film; otherwise you may damage the film. Make sure the white stickers on the back of the film holder and the areas around them are not scratched, dusty, or covered in any way. If the areas are obscured, the scanner may have trouble recognizing your film in Full Auto Mode. Do not cover the small holes in the film holder.
- Make sure the film strip is placed as shown below.
- Close the cover and press it down until you hear a click. Then press down on all the edges of the covers to secure them.
- Place the film holder on the document table so that the tab labelled “A” on the film holder fits into the area labelled “A” on the scanner.
- Close scanning bed lid.
Placing 35mm Slides
- Place the film holder on the document table so that the tab labelled “C” on the film holder fits into the area labelled “C” on the scanner.
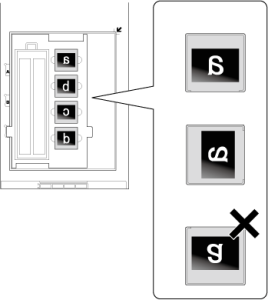
- Place up to four slides in the film holder with the shiny base side facing down. Your images should appear backwards on the side that faces up. Your images should be oriented as shown below.
- Close scanning bed lid.
Placing Medium Format Film
- Open the cover on the medium format film holder.
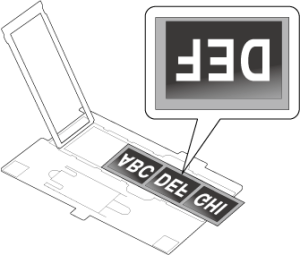
- Slide one medium format film image into the film holder with the shiny base side facing down. Your image and any wording on the film should appear backwards on the side that faces up. Make sure the entire image frame is positioned in the film holder opening.
- Make sure the film strip is placed as shown below.
- Close the cover over the film and press it down until it clicks. Then press down on all the edges of the cover to secure it.
- Place the film holder on the document table so that it is aligned with the upper left corner. Make sure the tab labelled “B” on the film holder fits into the area labelled “B” on the scanner.
- Close scanning bed lid.
Connect your external hard drive or USB to the computer. Open the Epson Scan icon located on the desktop. Note: If the icon is not there, search for “Epson Scan” and double click the icon that pops up.
Slides or Negatives Settings
You can use Auto Mode or Professional Mode. Professional Mode gives you total control of your scanning settings and lets you preview your images. If you use Professional Mode, recommended settings include:
- Set the Document Type to Film.
- Set the Film Type to Positive Film for slides and Color Negative/Black and White for negatives.
- Image type: 24-bit color
- Resolution: at least 1800 for slides or negatives.
Preview Slides or Negatives
Select the Thumbnail checkbox, then click the Preview button at the bottom of the settings window. The scanner should automatically recognize your slides/negatives as separate files. You can use the Frame icons on the left side of the window to rotate or flip each image that you select.
Scan and Save Slides or Negatives
- When you click scan, the file save settings will pop up.
- Select your USB or external hard drive as the save location.
- Create a file naming convention (something simple like event and year) and start with 001.
- Choose either JPEG or TIFF under IMAGE FORMAT. (If you want to resize your image file, TIFF is better)
- Click OK.